Prioritizing

My house is normally clean and tidy, well, fairly clean and tidy, I do have a teenager and many pets living here after all.  On a normal day my house is looking pretty good. The exception to this is when I am involved in a project, and since I’ve been involved in nonstop projects since last June my house has been in various states of crazy for about a year now. My usual approach ends up being me concentrating all of my focus to the project while neglecting most of the house cleaning in favor of getting the project down in as little time as possible. On paper that sounds great but it really isn’t feasible. Projects are inherently unpredictable, little things that should take just a few minutes end up taking ten times as long, Murphy’s Law at its most devious. The delays add up and ultimately screw up any chance of making a schedule and sticking to it. Of course, this means that the project isn’t getting that much closer to being finished and the house still isn’t clean. It definitely starts getting a little overwhelming.

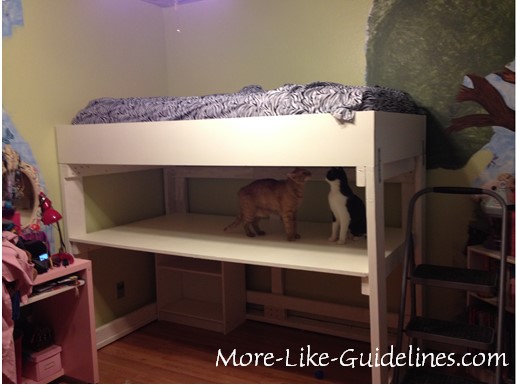
The current problem with this system is that my daughter’s BFF is visiting from Hawaii and I’ve got to get this house under control. Last June, we started transitioning her room from Disney Princess cute to Geek Girl Eclectic. We painted the room, I built a loft bed but there was sorting and a few other things to finish. I also needed to get the rest of the house back in order. Nothing like company coming to accelerate my cleaning schedule. Yikes!


BB loft bed


Preview …

I’ll be posting more about the changes that I made in this bedroom, so keep an eye out!

I took this pic of the loft bed about 30 minutes after it had been assembled.

Scotty and Wesley were quite helpful during assembly. At this point, they are conducting their own inspection of the desk.


Advertisement

A brand new start…

…with a brand new name.

Welcome to…

Logo with compassI decided to change the name at the end of last year, after stumbling across a blog with a similar name with teaching/school content. It was a little used blog but it still made me uncomfortable. I did a lot of research before choosing the original name to ensure that I wouldn’t be copying any aspect of an existing blog. It’s possible that the blog didn’t show up in my original searches because it hadn’t been used in so long.  Anyway, it made me uncomfortable and I wasn’t super excited about the name either. So after a couple of weeks, a few of what must have been seriously annoying conversations with family and friends, and many pages of scribbles, I finally landed on a name. I did a lot of research and found nothing with the same title, no blogs and no websites.  Yay!

I immediately loved the idea of using More Like Guidelines.  There are several reasons that it appealed to me so much, first is probably the most obvious, the Pirates of the Caribbean movie was so good and the quote “The Code is more like guidelines rather than actual rules” was just too funny and perfect.  For me personally, using More Like Guidelines was really fitting, because I seem to lack the ability to follow a pattern or instructions* to the letter.  I am constantly modifying and tweaking different aspects of a project to make it fit what I want.  So, to me patterns and instructions are really more like guidelines.

It’s been a while since I posted and I’ve been busy with several projects so I’ve got more than enough ideas to share.  For now, I’ll leave you with the Pirate hat that I created for Scarlet. I’ll be talking about this soon in future Costume Corner posts.

Red Pirate hat

Halloween 2013

*When I say instructions here I mean creative/arts & crafts instructions.  When it comes to tools, machinery, etc., I follow instructions to the letter.  Safety always comes first.

Fall Swag

Every year Scarlet and I work on a craft for Thanksgiving.  Sometimes the Thanksgiving theme is very strong like turkeys and pilgrims.  Other times our project is simply autumn inspired, like this project from last year.  Usually we make one for us, and then a couple for family members.

After looking around online we came across some beautiful Autumn floral arrangements.  After a bit more research we narrowed it down to swags that could be hung on a door or window.

Today, we got our supplies out and this is our final product.  We made each one a little different, although the flowers were the same in each arrangement.  I found some great flower bunches on clearance and used wire cutters to separate the individual flowers.  I made sure to leave part of the stem for attaching to the swag.  I added real eucalyptus for color and texture, not to mention the fragrance.

20131127-151437.jpg

20131127-151501.jpg          20131127-151451.jpg

*not the best pictures but the colors and general idea is there.

**I had originally titled this post ‘Gettin’ swaggy’ to annoy Scarlet, who rolled her eyes and said, “OMG, Mom, no!”  🙂

Costume Corner – Costume ideas for kids

For the most part kids have a good idea, if not many ideas of what they want to wear for Halloween, or even Comicon.  Every now and then though, for whatever reason, a kid will want to dress up/cosplay and have no clear idea for a costume.

Tips for finding ideas –

Some of these tips will seem simple and fairly obvious but when you are stumped and possibly stressed (think teenagers) the obvious can be elusive.

starwars

Check out this great tutorial at Melly Sews.

  • Popular movies (Avengers, Star Wars, Ghostbusters…)
  • TV shows  (new and old, Firefly, Star Trek, Walking Dead…)
  • Disney characters (primarily for little ones)
  • Video games  (Assassin’s Creed, Mario Brothers, Halo…)
  • Historical (Egyptian, Roaring ’20s, Ancient Greece, Wild West, 1950s…)
  • Comic books  (Superheroes, Sci Fi, Fantasy, Horror…)
  • Sports (Football, Baseball, WWE, etc.)


Specifically for little ones –

Most little kids are happy to be in something fun and cute.

  • Animals  (Cat, Dog, Lion, Elephant, Tiger, Bumble Bee, Ladybug)
  • Food  (Pumpkin, Cupcake, Banana, Popcorn)
  • Box  (Truck, Lego, iPhone, Crayons)
  • Characters  (Pirate, Fairy, Cowboy,  Princess)
  • Classic Halloween  (Witch, Dracula, Skeleton, Devil)
  • Elaborate (Dragon, Snowglobe, Dinosaur, Jellyfish)


Group costumes –

Sometimes the struggle to find a costume idea stems from two or more kids wanting to dress up/cosplay together.  Here are some group ideas.

JAPAN-CULTURE-HALLOWEEN

TORU YAMANAKA/AFP/Getty Images)

  • Avengers
  • Wizard of Oz
  • Justice League
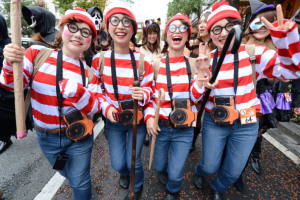
  • Where’s Waldo
  • Teenage Mutant Ninja Turtles
  • Lord of the Rings
  • Harry Potter


You can also do a quick internet search for group costumes, as well as, other ideas like ‘classic Halloween’ or ‘Video game’ costumes.   Pinterest is another great source for costume tips and ideas.

I hope some of these ideas will be helpful, or at least help lead you to other ideas that might work.

Next week, I will be talking about planning for group costumes.

This post will be crossposted on Cap’s blog, The Geek Registry.

Costume Corner – All about kids

I am sorry that I missed everyone last week.  My computer crashed last week and it took me a while to get everything back to normal.  There’s still a bit to do but I am ok to post again.  This week it will be a quick post about children’s costumes, I will follow up in later weeks.

Costumes for kids

In the past, I did make some costumes for my niece and nephew but for the most part, my experience comes from making Halloween costumes for Scarlet.  It needs to be said that Scarlet has been very free with her opinions since she was very small.  Many times Scarlet would see something on a movie or TV show that she would  then want for her costume.   I used a lot of my adaptation and modification skills to do my best to make her the costume that she wanted.

Every year we choose a theme and I make costumes for all three of us.  When she was younger, more often than not our theme was a direct product of Scarlet’s idea.  And for full disclosure, there was an idea or two that I steered Scarlet away from and onto something more appropriate.  Over the years, our themes have included witches, ghosts, mummies, vampires, zombies, fairies, angels and demons, and pirates.CC kids


About two years ago, I started hanging up Scarlet’s costumes as  part of our Halloween decorations.

From left to right…

1.  This is actually my mother’s high school prom dress, Scarlet wore it when we were zombies.

2.  That year we were ghosts because she wanted to be a pink ghost.

3.  Her Tinkerbell costume was one of the first that I designed almost completely without a pattern.

4.  This year Scarlet had seen a Disney sing a long, the main little girl wore an orange and black witch dress.  It was easy to make, of course, ours needed to be pink.

5.  The year we were angels and demons. I was an angel, Cap was a demon and Scarlet was a fallen angel.  Behind the dress you can see a bit of the feathers from the black wings that I made.


Next week, I’ll try to give some tips on how to find good ideas for kids costumes.

Costume Corner will be cross-posted at Cap’s blog, The Geek Registry.


Costume Corner – Renaissance Wedding, Part 4

Welcome to the fourth and final post on my Renaissance wedding.  Today, I am talking about what the groom, groomsmen, guests and the minister were wearing.

Groom

McCalls 2802

McCalls #2802

Cap’s mom made his tunic from McCalls pattern #2802.  It’s the style shown in blue and white in the picture on the right.  Let’s talk about that picture though,  kind of  ridiculous, right?   I mean, what is with that hat?  I’ve never seen any Renaissance costume with a hat like that.  Obviously, we skipped the hat but we also skipped the jaunty vest that they refer to as a surcoat.

CC RW 4aCap’s tunic is was made from blue velvet.  If you’ve never worked with velvet, it can be really difficult.  When sewing you have to pin the velvet every inch or so because it slides like crazy.  It sews pretty well once you have it pinned down, you just want to make sure that it’s all lined up.  There’s nothing worse than finishing a long seam only to find that there’s a puckered spot midway through the section.  Velvet is really heavy as well, so the seams need to be strong.

GroomsmenCC RW 4b

The tunics the groomsmen wore were also from McCalls #2802, in a black velveteen.  Cap’s mom sewed those as well, the shirts were made from white broadcloth from the same pattern.  We cheated with the pants and just bought leggings since they would be tucked into the lace up boots.  I matched the cording for each groomsmen and bridesmaid pairing, only because I am kind of dorky like that.   The guys said that the tunic and pants were very comfortable.

Family

I made my father the same tunic, shirt and pants as the groomsmen.  Originally, I wanted to make him something a bit more fun and interesting but since Cap’s father was his best man I didn’t want to do anything offset the balance there.  It was a good decision because he looked great with my mom in her black velvet dress.


CC RW 4c


Butterick 5656
Butterick #5656


My brother and my nephew used Butterick pattern #5656. They looked great in their tunics and capes.

Here is a pic of the flagbearers, my brother’s oldest, my niece and nephew.  So happy that they could be there and part of the wedding.


Minister

We found a great minister, he was a friend of a friend and he was awesome.  He was happy to work with us and wasCC RW 4d quite accomodating with our less than traditional wedding.  When we talked about the wedding and what he would wear I offered to make him a costume.  He was very pleased.  I honestly can’t remember if I made him the cassock type robe underneath or if that was his already.  I did so much sewing during those six months and especially in the last month that I just don’t remember.   If I did, the robe would have been made out of white muslin and just made to slip over his head.


Princess bride priest1

I modeled his robe off the of the bishop’s robe in The Princess Bride.  It was much simpler and less ornate but I was really pleased with how it turned out.   I used a rectangular piece of fabric, I believe I used party taffeta, mostly because it has a stiffness to it without being very heavy.  In the front I added a panel connecting the two edges, I embellished it with gold fabric and trim. CC RW 4e I appliqued a large stylized Celtic cross to the back.   The back of the robe was long enough to trail behind him a foot or two.  There is a picture somewhere of him walking away with his robe flowing out behind him but I’ve looked through our photos about five times trying to find it but it is nowhere to be found.  I’ll update this post though it if shows up.


All in all, the wedding was a lot of work but it was so much fun and I love that instead of spending money on renting tuxes and horrid bridesmaid dresses that would never be worn again, I provided a costume that they could wear whenever they wanted.  It was definitely worth the work and since I did so much creatively; sewing, bouquets, vows,  the wedding really was uniquely mine.

I will leave you with my absolute favorite pic from the wedding.  We had just signed the marriage certificate and we had a moment to ourselves before pictures started.

CC RW 4f

Next week, I’ll be talking about costumes for kids.

Costume Corner will be cross-posted at Cap’s blog, The Geek Registry.

Summer break

I can’t believe that summer is almost over.  This is the first summer that we didn’t have a Summer Session set for Scarlet.  (Completely unintentional alliteration there but fun nonetheless.)  This year we had a summer reading list and Scarlet has been guest blogging on Cap’s blog writing weekly movie review essays.

Our normal Summer Session would have a theme and I’d plan lessons around that theme. For the most part, lessons would involve handwriting, spelling, grammar, reading, math, history, geography and science.   I’d also work a couple of art projects into the six week session.  Our Summer themes have been Ancient Egypt, Middle Ages, Zoo Life, Ocean Life and Doctor Who.


School SS 1Here are a few worksheets that I put together for our Zoo Life Summer Session.  The Zoo Life came from a conversation with Scarlet about what to call different groups of animals.  She loved watching Animal Planet and loved that group of cats is called a clowder.  Then she heard that a group of crows is called a murder.  Before she asked me 500 more questions I suggested that we choose Zoo Life for our summer lessons and we could learn all of the groups over the summer.

The facts sheets included a coloring page picture, information on the subject and a world map to mark the habitat.


School SS 3


I created the math sheets on Math-Aids.  I moved the worksheet part into an Excel page that I created adding the header and the cute clip art.


School SS 2We decided on Ocean Life after a fun trip to the aquarium at Lego Land in California.  Scarlet and I enjoyed the sea horses and rays, Cap was partial to the sea turtles and jellyfish.  After we left the aquarium we talked about other creatures that lived in the oceans that we hadn’t seen at the aquarium, we decided that otters, seals and dolphins were some of our favorites.

We covered Ocean Life the following year, I kept the coloring page picture and the world map but it was Scarlet’s job to do the research in order to fill in the facts part.


We watched a lot of  Doctor Who that year tryinSchool SS 4g to get caught up for the 50th anniversary show.  While we were watching we realized that there were so many historical and scientific references that we had a lot of opportunities for some fun summer learning.  I made this book report sheet that we actually used for some episodes.  Scarlet was surprised and pleased that she could apply the same  ideas for book reports to the episodes.  Even better she got to pick her favorites episodes to watch again.

It was nice having a less intensive summer but I do miss making fun worksheets and surprising Scarlet with fun coloring pages.  I know that she’s outgrown them, she’s an amazing artist in her own right and coloring other artists isn’t as fun as working on her own drawings.  She takes after me though and often makes her own designs from different ideas and references, so I can still direct some fun art related exercises into our lessons.

I am off to do some more planning for this coming year.  Enjoy the last few days of summer!

Costume Corner – Renaissance Wedding, Part 3

Hello again!  So sorry that I missed posting this last week.  I sprained my wrist and typing was seriously not working for me.  After several attempts, I thought it would be better if I let my wrist heal rather than make a two week injury last four or five weeks.

This week, I’ll be talking about dresses; bridesmaids, attendants and a few others.

BridesmaidsBridesmaids
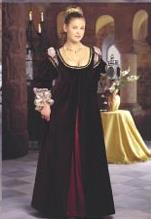
I’ve already mentioned that I used Simplicity pattern #8735 for the bridemaid dresses, and specifically this version which I believe is style B.

In Costume Corner – Renaissance Wedding, Part 1, I talked about the main modification to the dresses, the separate underskirt.  The underskirt was made with silkessence and a rounded elastic neckline.  We made a minor adjustment with the gauntlets, the floating sleeve pieces.  I opted to eliminate them from my dress but the bridesmaids liked them so they were left in their outfits.  The pattern had them attach with grommets and ribbon or cording.  Our original experience with setting the grommets was not successful so we opted to go with out them.  My bridesmaid in the purple dress, Bea*, added elastic to hers which worked great.  I wanted to add elastic to the others but the outfits were already with the bridesmaids.  We were in the final stretch and due to the time crunch, schedules, and geography it just didn’t happen.  The gauntlets ended up a little slouchy over extended wearing but it was a little thing, so I didn’t stress about it.

CC RW 3a

This first photo is my sister and Matron of Honor in burgundy and silver as she walks down the aisle.  All four of my bridesmaids are shown in the next image, showing the different colors.  I am going to go ahead and brag about making the bouquets too.  They were fun to make and turned out exactly how I wanted them.  In the final photo, you can see Jay and Bea walking down the aisle.  You can see the nice flow of the dress as she walks.  I helped with Bea’s dress but she did a fair amount of the finish work too.

CC RW 3bHere you can see the back of Bea’s dress.   I finally got the hang of setting grommets and they looked great strung with the ribbon.  Bea used metallic silver ribbon to lace the back closed.  It took a fair amount of time and dexterity to lace the dresses, not overly complicated but not a super quick thing either.


Other dresses

I made a fifth bridesmaid dress for a friend that took on the job of stage manager the day of the wedding.  She made sure that everyone was in the right place when the wedding started.  Each bridesmaid and groomsman knew when to start down the aisle and my two flower girls felt very comfortable knowing they had someone right there to help them know when to go.  My two nieces that helped to carry my train down the aisle had similar dresses with simple muslin underskirts and no gauntlets.

Simplicity 8192

Simplicity #8192

I used Simplicity pattern #8192 for two friends, one helped with my hair and makeup and the other was in charge of the guest book.  I don’t have any good pictures of their dresses**  I used the main style from the pattern except I changed it so the little top laced in the back.  Neither friend was fond of the overly boob-ish look when laced in the front.  Modifying the over-bodice wasn’t too difficult, I combined this pattern with the bodice pattern from the bridesmaid dresses.

One dress had a lavender underskirt with a silver over-bodice.  The other was a dark red underskirt, with a woolen plaid over-bodice to reflect her Scottish heritage.

Flower girls
Butterick 6203

Butterick #6203

My two youngest nieces were my flower girls.  I found this pattern, Butterick #6203, it was clearly a different style but it was so cute that it wasn’t an issue at all.

A decision was made early on in the wedding planning that my family would be wearing burgundy and silver.  While growing up my father was a high school football coach and many of those years had been spent at the same school.  My father started teaching at the school the year before I was born and was still there while my older brother, then my sister attended and me, as the youngest.  It just seemed logical that that the family colors would be red and gray, or for Renaissance sake, burgundy and silver.

I’ve already mentioned my sister and posted a photo of her dress.  My brother and his wife, have four kids, so they did a lot of sewing.  My sister-in-law and eldest niece wore burgundy velvet dresses that looked almost exactly like the photo on the pattern, they looked amazing.

CC RW 3c

My two youngest nieces though saw the pattern and insisted on purple.  I remember talking to my brother about the issue.  He had put off the call because he didn’t want to upset me since he knew I was busy with wedding prep.  I think I said something about if the girls wanted to wear purple that I was fine with that.  I heard a big sigh and “oh good, because they both were pretty adamant on wearing purple dresses.”

When I saw my nieces the morning of the wedding, I was blown away.  The dresses were amazing and they were so proud of how pretty they looked.  Yes, there was twirling.  Honestly, they couldn’t have been cuter.  It’s been almost fourteen years since then and they are both in college,  hopefully they won’t hate me for posting this photo but it’s one of my favorite memories from the wedding.

Mother of the Bride

My mother’s dress was kind of an unknown entity.  During planning my mother wasn’t exactly helpful, not that she was difficult really.  There were a few things going on but she kept saying stuff like “oh whatever you want to do, is fine with me.”  Of course, that translated to me that she wasn’t that interested in her dress.


CC RW 3dOn one of my shopping trips I found a black velvet with a glittery silver pattern.  I know black seemed like an odd choice but I just thought it would perfect.  There was something really classic and regal about it.  My mom was really skeptical and I told her to trust me, and, well, she did and it turned out great.  I made my mother’s dress almost completely without a pattern.   She was cooking and I had my sewing machine set up on the kitchen table.  I would measure her and then cut stuff out

and then sew it together and try it on her.  Essentially her dress is the same as the bridesmaids and family dresses but my mom was tiny.  She was 4′ 10″ tall and weighed a little over 100 pounds, maybe.  I made a silver underdress like the rest except I made custom sleeves.  I used the black velvet but split the sleeves vertically in the middle and added a gusseted piece of the silver.   This where I am going to brag, this was like a Project Runway moment for me, before the show was even on.  I pretty much made these sleeves by ‘draping’ the fabric on her arm, I made marks using pins, cut it out and sewed it together.  The overdress went over the underskirt and it looked great.  My mother was impressed and then broke down in tears. She finally told me that her hesitance in getting involved had to do with not adding more stress for me and that she was a little in denial over her little girl getting married.CC RW 3e

In 2009, we dressed as vampires for Halloween.  Scarlet wore my mother’s overdress over a new purple underdress and looked quite tragic and soulless.  If you click on the photo you can see the glittery pattern a little better.


Mother of the Groom
Butterick 6197

Butterick #6197

McCalls 7756 sm

McCalls #7756

Cap’s mom made her dress from this pattern, Butterick #6197, which I loved.  She used a dark royal blue brocade with a red underskirt.    She took her hat from the pattern on the right, McCalls #7756.


CC RW 3f

Next week, I will wrap things up with the groomsmen, other men’s outfits and the minister’s robe.

Costume Corner will be cross-posted at Cap’s blog, The Geek Registry.


*I won’t be using real names here, to protect the innocent.  🙂

** We had a problem with another person taking pictures with the flash while our photographer was working.  Many of our photos were ruined by either weird lighting or closed eyes from the errant flash.
Costume Corner – Renaissance Wedding, Part 2

Last week, I talked about where I got the ideas that inspired the attire for my Renaissance wedding.  In this post, I am going to try to connect those original ideas with the actual garments.

I feel like I should start this off with mentioning that historical accuracy wasn’t really in the forefront of my thought process.  It was my wedding; I wanted to look pretty, I wanted to be comfortable and I wanted people to have fun.  I definitely wanted a Renaissance look, but, honestly, those three things were my main criteria.

My Wedding Dress

CC RW 2a

*Funny moment

As you’ve seen in the previous Costume Corner post, I incorporated a lot of blue into my dress.  This happened for a number of reasons, the most important being that blue is my favorite color.  The particular color I chose had to do with my engagement ring.  Weirdly enough, I am not a huge fan of diamonds, I think they look great on other people but they’re just not that exciting to me.  Sapphire and blue topaz have always caught my eye and thankfully Cap was an amazing listener.  When he proposed he presented me with a beautiful ring, an oval cut blue topaz set on a white gold and yellow gold band.  It was beautiful and perfect and I still love it fourteen years later.  I’d post a picture but I lack the ability to take a good photo of the ring, and if I post a pic I want it to look as beautiful as possible.  Also, no one needs to see my hands today, I was painting earlier and there are still some traces of Star Shine evident.  No need to worry, all of my rings were removed earlier and are safe on my ring holder.


Blue fabric

Glitter organza – Silkessence

So, I knew that I wanted blue topaz in my dress, I also knew that the main part of the dress should be kind of bridal looking.  I didn’t necessarily think it needed to be bright white but I didn’t rule it out either.  I went through several ideas, a white dress with a sheer white overlay, a blue dress with a white underskirt, a white dress with a detachable train, a white dress with a blue cape, blue dress with a snowy white cape, white dress with a blue train, and probably twenty other ideas that I don’t remember at this point.  When I came across the Simplicity #8735 pattern I began to really see what I wanted to do.  I had found the Silkessence and the Glitter organza in the perfect shade of blue.  All I needed to do at this point was find fabric that would go with the blue.  I wandered through several fabric stores armed with some sample pieces of my blue fabric, finally I found something that caught my eye.


Dress brocadeI found this cream brocade at a large fabric store.  I bought what was left on the roll which I believe came to about 20 yards.  I knew I wanted a long train and since I wasn’t sure of the specifics it seemed smarter to buy it right then rather than needing to go back and hoping it would still be there.

I posted two photos to show both the pattern and the sheen, which clearly changes depending on how the light hits it.  The cream colored floral pattern is raised with the champagne colored shiny background.  The pattern and color seemed elegant and regal, which was perfect for the theme.   I loved it, still do, and it went well with the blue.

Sewing notes –

I already mentioned that I used the bodice from McCall’s pattern #2308, I should also mention that I modified it so that it clasped in the front.  I could have done grommets and lace it up in the back like the bridesmaids dresses or added a zipper, which I believe was part of the actual pattern instructions.  The overskirt was going to be open in the front so I thought it just made sense to have the bodice clasp in the front.   Also, I love how the grommets and lacing look but they can be a pain to work with, add that to the weight of the fabric and the front closure just seemed like an even better idea.  I cut the pattern pieces out of muslin first to test my idea out.  I followed the pattern until I got to the middle part where the pattern piece would normally sit on the edge.  Before I started cutting I had set the pattern about six inches from the edge, I stopped cutting the diagonal with about 5 inches left and cut straight across to the edge of the fabric.  I cut out a one piece back piece and sewed the two together to make a mock up bodice.  With the help of my mom and sister, we pinned the muslin until it fit the way that I wanted.  I turned the muslin into a pattern for the actual bodice for my dress.

Hook and bar closure

I used two hook and bar closures in the front,  one at the ‘V’ where the front met and the second, slightly lower at the seamline where the bodice met the skirt.  The two clasps worked perfectly with the heavy fabric and there was no worry that if I shifted that the front would open accidentally.


Train

hooks and eyes

My train was made up of three panels of fabric, 54 inches wide and four yards long.  At the top, I gathered it into large pleats and hand stitched them into place.  Originally, the train was going to attach at the waist but the weight of the train pulled straight down making the front of the dress all scatterwhoppy (yes, that is the technical term).  My mother suggested attaching it at the shoulders, which kind of satisfied my wish for a cape.  I used large hook and eye closures, I sewed two eyes on each shoulder of my dress and matching hooks at the top of each side of the train.  It attached and detached easily and didn’t cause the front of the dress to shift.  There was some pulling during the ceremony when we turned to face each other and no one thought to rearrange the train behind me but it was a minor thing.

Veil

My veil was essentially the same as the train.  I hand sewed three panels together, then gathered the top edges to the width that I wanted.  I had a pretty but simple gold tiara, I wrapped ribbon around the ends, feeding it throughCC RW 2b the spaces between the comb teeth.  I sewed snaps onto the ribbon and to the top veil edges, making the veil detachable for the reception.  I added flowers to camouflage the gathers and turn the tiara into a flower crown.

Gold oval bead

The bottom edge of the veil was lined with gold oval beads.  I hand sewed the beads on the veil and around the hem and  front edges of my dress.   The beads were strung on thread and then hand sewn onto the hem and the veil.  I spent a lot of time hand sewing while watching TV those last several months before the wedding.


Fairly good view of my train and veil.

Fairly good view of my train and veil.


My Renaissance wedding was supposed to be one post but apparently I have a lot to say about it.  Next week, I’ll be talking about dresses; bridesmaids, attendants and a few others.  See you next week!

Costume Corner will be cross-posted at Cap’s blog, The Geek Registry.


* We were laughing in this photo because the minister began our ceremony with the ‘Maiwwage’ monologue from ‘The Princess Bride’.  It was awesome and perfect, a great start to what we wanted to feel like a big party rather than a boring wedding.