Costume Corner – Renaissance Wedding, Part 1

Way back in 1999, I met my husband, Cap.  We were both working in a large chain bookstore, in between school and permanent career type employment.  We first started talking about marriage on the road trip back from Disneyland.  I mentioned that I thought a Renaissance themed wedding would be fun and Cap agreed.  I knew he was a keeper.

I started doing some research on different styles and began narrowing down my preferences.  I came back to some movies that had started my interest in the time period.   There’s more than likely some historical inaccuracies in many or all of these but that wasn’t really a primary concern at the time.  I loved the Old Hollywood swashbucklers like ‘Robin Hood’ with Errol Flynn and the 70’s version of the Musketeer movies with Michael York and Raquel Welch.  In the 90’s, I enjoyed ‘Robin Hood: Prince of Thieves’ and ‘The Three Musketeers’ with Kiefer Sutherland and Gabrielle Anwar.  My absolute favorites were ‘The Princess Bride’ and ‘Ever After’, the movies came out ten years apart, fall of 1987 and summer of 1998, respectively.  Both films influenced a great deal of the planning of our wedding.

Dresses

The Princess Bride

Princess Bride trio KC

Buttercup’s dresses were beautiful, I loved the flowy sleeves and the trains from the shoulder.  I especially loved the color and fabric of the blue dress.


Ever After

EverAfter Trio KC

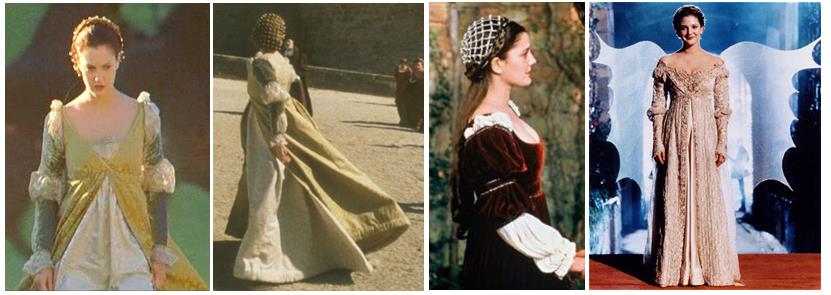
Danielle’s dresses were beautiful too, especially the split front overdress that added so much fluidity to the bottom of the dress.  I also liked the overlay of the necklines on the overdress and underskirt in both the gold dress and the ball dress.

My final result incorporated elements from both movies.

Patterns

I am addicted to buying costume patterns, so, I own almost every Renaissance pattern that has been available at Joann Crafts in the last fifteen years.
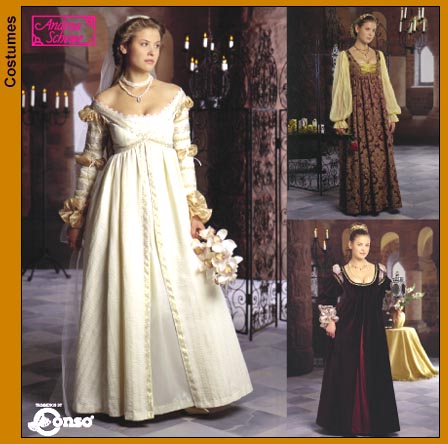
Simplicity 8735

Simplicity 8735

For the bridesmaids, I used the style in the lower right hand corner of Simplicity 8735*.

The main modification to this dress, is making a separate underskirt.  I used silkessence for the underskirt, cutting a new pattern that eliminated a front seam and added a rounded elastic neckline.   The sleeves were made from sparkly sheer material that I believe was called ‘glitter organza’.

The bridesmaids were able to pick any color for their dress except blue.  They also were able to pick any appropriate fabric.  I sewed a purple brocade, a deep red damask, hunter green velvet and a goldenrod shangtung.

Bridal dress

I combined the Simplicity 8735 pattern with the McCalls P477** for my dress.

McCalls 2806

McCalls 2806

I used the bodice of the overdress with the V- neckline from the McCall’s and made the underskirt using the Simplicity.

The skirt part of my overdress had some issues, in a stressed moment I made the decision to cut straight panels for the skirt and just gather them at the waist where the skirt meets the bodice.  The fabric was so heavy and thick that gathering so much fabric at the waist wasn’t such a good idea.  Now that I know much more about sewing, I would have made flared pieces for the skirt.  Sections that would be thin at the waistline and then flair out as they extend down to the hem.  Live and learn though, right?

For my fabrics, I chose an ivory brocade with a champagne background for the overdress with blue topaz for the underskirt.  I also had a 15 foot train attached at my shoulders.

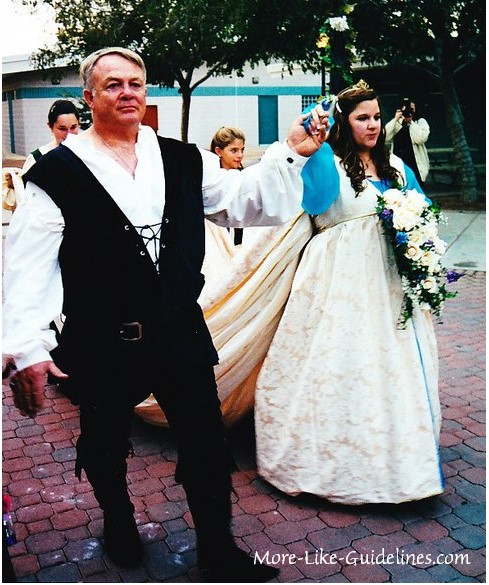
Here’s a picture of my father walking me down the aisle.  Two of my nieces helped carry my train as I walked.  They had to really hold on to the corners because it rained on and off before the ceremony.  If you look closely you can see that the brick is still wet.  You can also see that the little jog in the hemline closest to my dad.  Someone stepped on it while we were getting ready and it wasn’t noticed until right before we walked out the door.

CC RW 1a

I intended on getting into the planning and sewing part of things a little bit more but the internet is being dodgy due to construction and possibly some storm action.  Next week, I will try to share some more details.

Until then… have a great week!

Costume Corner will be cross-posted at Cap’s blog, The Geek Registry.


*I believe Simplicity 8735 is out of print.  I remember at some point seeing it under a different number but I haven’t seen it recently.

**McCall’s P477, was also released as #2806 but that seems to be out of print as well.

Advertisement

Costume Corner – an introduction

I’ve decided to start posting every Saturday about my adventures in costume making.  I will also be crossposting this on Cap’s blog, The Geek Registry.

Adventures in sewing…

Here’s the deal, I love costumes.  I don’t know if it’s because of my love of old movies, or all of the books I read when I was a kid, or maybe my interest in history or quite possibly something else entirely.  I am sure it’s the result of some crazy combination of things, whatever it is, I really enjoy making costumes.

I can sew pretty well, I am not the best ever but I am definitely not the worst either.  My mother was an amazing seamstress, a fact that I’ve just only begun to appreciate in the last several years.    My mother sewed for the holidays, costumes at Halloween and dresses and decorations at Christmas and Easter.  She made clothes for herself  and the rest of us, including swim suits.  She also did a lot of sewing around the house, like curtains, tablecloths, bedspreads, dust ruffles and anything else that was needed.  My favorite was an elegant set of scalloped, sheer roman shades for the formal dining room.

When I was young, probably 7 or 8 years old, my mother taught me how to sew.  I wanted to make presents for family members for Christmas.  She started me on straight stitches and then a little zig zag.  That year I made fabric pouches that held individual tissue packets for everyone in my family for Christmas.  I wish I had a picture so that I could post it here.  They were super simple but I was very proud of myself.

After that, my mother went over how to cut out a pattern and properly pin the pattern pieces onto the fabric.  She explained how to match up the different pieces following the various match points, and dots.  Then I learned about clipping edges, sewing darts and a bunch of other stuff.  After that she just let me venture out and work on my own projects.  After that I learned a lot just bumbling my way along, I suppose at some point I should have asked her for more lessons and pointers.  I have some blind spots, like zippers, I am still in the process of learning how to put in a zipper.  I am very proficient in adding snaps, hooks and velcro though, so that’s a good thing.

The silver lining to all of  the trial and error is that I developed really good problem solving skills.  I’ve learned I can tweek almost any pattern, and at this point they’re more like guidelines really.  It is not rare for me to combine one or more patterns to create one piece or outfit.  Sometimes I end up using tissue paper or muslin to create my own patterns.

My biggest sewing project was my wedding in 2000.  When we were first talking about getting married I suggested we have a Renaissance themed wedding.  Luckily enough, my then fiance/now husband was all for the idea.  I made my dress, all of the bridesmaid dresses, my Dad’s tunic, a robe for the minister, as well as six other dresses.    Next week, I’ll go more in depth about the wedding.  Here’s a pic though, to tide you over.

CC Intro

Costume Corner will be cross-posted at Cap’s blog, The Geek Registry.

Desk makeover


Desk before after 1

Scarlet has needed a new desk for a while.  My original plan was to modify her current desk by adding a bigger desktop and putting spacers in to raise the desktop.  Due to many interruptions and complications, I was never able to get the materials and tools together to fix her current desk.

Luckily for us, we came across a desk that I thought had some real potential for Scarlet and the school room.

Desk before
Scarlet really liked the look of the desk and our plan was to paint it white.  The top of the desk originally had a sort of a vinyl shelf paper covering.  The vinyl peeled off rather easily and I decided to remove it from the desktop, the small shelf on top and the shelf on the lower left.  The two shelves on the right weren’t peeling off and I figured leaving them was a smarter option.**

I moved the desk outside, removed the keyboard shelf and small desktop shelf.*  Next, I peeled the vinyl off and then sanded the top and lower shelf.  I also sanded the black shelves lightly so that the paint would adhere to the vinyl.  At this point, I also taped off the metal legs to protect them from white spray paint.  This took forever and in 104 degree (F) temperatures was not actually all that fun.

Desk makeover 1
I started with a Krylon primer, it didn’t seem to cover very well but it’s the first time for me using a spray primer so it may have been user error rather than the product.  I had really good luck with Krylon Colormaster paint + primer spray paint with the semi gloss finish.  (If I had to do it again, I would skip the primer and head straight to the paint plus primer option.)  This isn’t the greatest photo but the shelves looked great at this point.  The problem was the desktop, there were spots that just wouldn’t take the paint, not sure whether it was a glue issue or distortion of the MDF where the legs were attached.  Either way we needed another alternative for the desktop.

Desk makeover 2

After some thinking, I remembered some old maps that I had come across in the garage.  My dad was a teacher and brought home these beautiful National Geographic maps for me.  Scarlet and I shuffled through the maps and picked two world maps.  I used Mod Podge to decoupage the map pieces onto the desktop.***  There are three pieces, the main image and two smaller pieces on each end.  The main piece was a glossier map from 1996, I didn’t even know that my dad was still bringing home the maps at this point.  I had graduated from high school, uhm, a couple of years (or more, maybe) before that.

Desk makeover 3
The second map was one that we’d used a lot while we talked about world history.  If you look closely at the keyboard shelf you can see the fold lines and even the yellowing from the old cellophane tape we had used to fix it years and years ago.  I used this map for the keyboard shelf, the lower left shelf and the small shelf on the desktop.

Desk makeover 4

So, then we started thinking about a chair to go with it.  Scarlet’s current desk chair is red and black so we decided she needed a new chair.  She also had a light pink chair from IKEA, it matched a desk she had originally used at her grandmother’s house but was sent home with us and it now being used as a vanity table in her bedroom.

I detached the seat part of the chair from the base so I didn’t need to tape anything off, much quicker and easier that way.  I used the same Krylon Colormaster paint + primer semi-gloss paint on the chair.  It took two coats and a touch up pass and it also looks great.

All in all I applied three coats of Mod Podge over the maps and then sealed it all with a clear coat.  This was a great, inexpensive project.  The desk was free, I already had the maps and the Mod Podge.  My total cost was about $15, give or take a little for tax, and that was all paint, (primer, paint and clear coat).  This project was fairly easy, as well, I started Saturday afternoon and finished Monday afternoon.  I probably could have done it in a day, day and a half, there’s a lot of trips to add a coat on and then go do something else.  Put a second coat on and go do something else.  I logged a lot of steps on my FitBit the last three days just from walking back and forth to paint, Mod Podge and clear coat..

I am so happy with how it turned out and Scarlet is really excited to use it.  The next project will be getting it into the school room.  Oh, and new curtains the red and black ones won’t work in the school room any more either.  Hmmm…

Desk after

* Tools used:

  • screwdriver to remove/attach keyboard shelf
  • – allen wrench for desktop shelf
  • – pliers to remove/attach seat from chair base
  • – sandpaper and sanding block

 **I was really glad that I had made this decision when it came time to deal with the map.  Trying to cut the map piece around the shelf support would have been a real pain in the butt.  I like the contrast of the bright white with the colors of the map. 

*** I am total rubbish at decoupaging.  I love doing it but it seems that no matter what I do I get wrinkles and bubbles.  So, considering that little factoid I will not give any tips on decoupaging.  I recommend checking out the Mod Podge Rocks! blog because they totally know what they are doing.

Homeschool – My Lessons Learned

Lessons Learned

My first experience with homeschooling came through my sister who began homeschooling her kids because her oldest had ADHD with food allergy. When she sent him to Kindergarten at the local public school they repeatedly fed him snacks and drinks that my sister had requested not be given. The artificial flavors and colors, among other things, triggered his hyperactivity. The teachers would then complain about his out of control behavior. Ya think?  As long as he stuck to his diet he was a normal energetic kid that also, oddly enough, really did have an attention span. I began my hands on homeschooling journey teaching both my nephew and my niece from about sixth grade through high school. It was fun and challenging, I learned a lot as the weeks passed, and not just about world history but about how each child learns differently. My nephew was very hands on, fractions made no sense to him until I cut up paper plates and let him play with them. Once he could physically move the pieces around then it all made sense, it was definitely one of those lightbulb moments. It was great for him, and for me, because of what it taught me about teaching.

I’ve been homeschooling our daughter, ‘Boo’ since the beginning. Homeschooling is great, it’s a lot of work and definitely challenging, but the rewards are great. Each lesson or concept that I teach is gone over until Boo gets it before we move on. If there is a sick day or vacation day, then we postpone the lessons and pick up where we left off. No missing material because of absences, planned or unplanned. The other advantages include not having to worry about bullying or teachers saying or doing something inappropriate, not to mention the violence in schools that seems to be so prevalent lately.

School year vs. Summer

When I first started Boo in Kindergarten her books had 160 lessons, five lessons a week for 32 weeks. It worked well that first year so I have been sticking with that plan. That means our school year has 32 weeks of lessons, split into two 16 week blocks, one before Christmas and one after. I’ve divided the blocks into two, 8-week sessions. There is a week-long break built into the calendar that falls between the two sessions, a Fall and Spring Break.  I also take into account holiday weeks, Thanksgiving and Easter weeks are also scheduled for no school.  Although I can use the first three days for catch up if we had sick days to make up, more often we use those days for some extra holiday crafts. We usually start the Fall block the third week of August, break for the holidays the Friday before Christmas. The Spring block starts the third week of January and we usually wrap the school year up the second week of May. Give or take a week depending on the calendar and how the holidays fall within a week or month.

Our Summer Session is six weeks long, after a three-week break following the regular school year.  There is another three-week break between Summer and when we start the new school year in the Fall. During Fall and Spring our school day lasts about five hours, maybe six hours if we have a science or art project. During the Summer Session our school time is usually about an hour, sometimes longer because Boo loves to draw so the art projects might be more involved.  My aim for the summer is to keep up comprehension so it doesn’t need to be complicated.  I try to make it fun and interesting and fairly quick.

Since retention is my main goal we work on math, handwriting, spelling, grammar and reading.  I usually pick a theme for the summer and we do some fun projects and activities that stay within the theme that can also tie in some of our other subjects like science, history, geography, and art.  We’ve done Egyptian Pyramids, Middle Age Castles, Zoo Life and Ocean Life.  Last summer was Ocean Life, I found and made some fun things to work with. For spelling and handwriting, I had an ocean themed word-find book (found on Amazon). I pulled spelling lists from the word finds and she practiced her handwriting while copying the spelling words  We researched ocean explorers for history and geography, each week we picked animals for reading, science and art.  In that light, Math wasn’t all that exciting.  I made activity sheets with addition, subtraction, multiplication and division problems, I added cute clip art of shells and starfish to make it more fun visually. Boo didn’t really like the Math but she liked coloring in the artwork.

I am still working everything out for this summer, our theme is Time Travelers.  Boo loves Dr. Who, so do I, so it should be fun. We can study the solar system for science, pick various historical events for history, geography and reading. I can build spelling lists from Dr. Who, the solar system and the historical events.  Math will be the same as last summer with the addition of fractions and maybe some clip art of the T.A.R.D.I.S. and some planets.

I have done and continue to do a lot of research online. Before I pick a curriculum I read as many reviews from as many different sources as possible. The reviews are important to read not just look at the stars or rating because sometimes the reason for a low rating had to do with the style of teaching or the amount of prep work and not the content. Some of the curriculum available includes multiple subjects, you can buy one kit for the year and be set. When I was teaching my niece and nephew we had a program like this. The problem I found with this is that one section like Language Arts would be strong but the Science would be somewhat weak. I use different curriculum programs for every subject using the one that fulfills our content requirements and works the best for us. * I am not an expert on homeschooling by any means, I am only doing what is working for us and ensures that my daughter is getting the best well-rounded education that she can get.

*Each state has their own requirements for homeschooling, researching your state’s requirements and regulations is an important step.


— Originally published at the What Every Betty Said website June 12, 2013.

Crafty me

I love to work on crafts; sewing, scrapbooking, knitting, holiday crafting, stencil painting, card making, paper crafts, needle crafts, you name it and I have probably done it.  I am actually hoping to start quilting this summer and I really would like to learn how to knit.  I have knitted hats and scarves using the knifty knitter but knitting with needles might be fun too.

What I really need to work on though is my craft room.  It’s a mess, and mostly because everything in the house that doesn’t have a normal place gets shoved into the craft room.  Of course, it’s also the school room and a place for Sully’s collection of board games and other stuff.  

I would really like to get started on scrapbooking again.  Hopefully, I can start after the Spring Cleaning crew rolls through that part of the house.  I have a great table in there that I got at IKEA, folded up it is about 14″ wide.  You can lift one side or both to make a table that measures 28″ X 56″.  

I drooled over this table for a year.  I saved money here and there and finally got it a few years ago.  We drove over in the middle of the week and I told Sulley he could stay in the car because I would be back in ten minutes.  He was being cranky and bet me that I couldn’t do it.  Silly man!  I rushed up the escalator through the top floor, down the stairs to the warehouse, power walked past a couple.  I went straight to the aisle with the table, grabbed the box met up with the couple I power walked by.  I told them I was power walking because my husband said I couldn’t get in and out with the table in ten minutes.  The wife said “You better show him” and the husband was in shock, he didn’t think anyone could get in and out that fast.  I found a cashier with no line, paid and left.  I got back to the car with about a half minute to spare.  It’s an amazing table but I don’t  think they sell it anymore.