
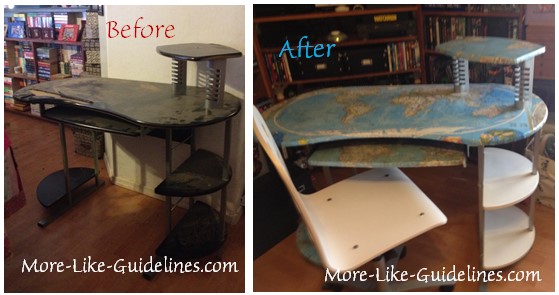
Scarlet has needed a new desk for a while. My original plan was to modify her current desk by adding a bigger desktop and putting spacers in to raise the desktop. Due to many interruptions and complications, I was never able to get the materials and tools together to fix her current desk.
Luckily for us, we came across a desk that I thought had some real potential for Scarlet and the school room.

Scarlet really liked the look of the desk and our plan was to paint it white. The top of the desk originally had a sort of a vinyl shelf paper covering. The vinyl peeled off rather easily and I decided to remove it from the desktop, the small shelf on top and the shelf on the lower left. The two shelves on the right weren’t peeling off and I figured leaving them was a smarter option.**
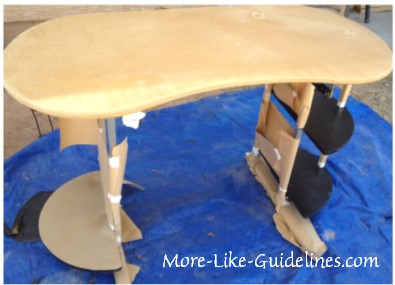
I moved the desk outside, removed the keyboard shelf and small desktop shelf.* Next, I peeled the vinyl off and then sanded the top and lower shelf. I also sanded the black shelves lightly so that the paint would adhere to the vinyl. At this point, I also taped off the metal legs to protect them from white spray paint. This took forever and in 104 degree (F) temperatures was not actually all that fun.

I started with a Krylon primer, it didn’t seem to cover very well but it’s the first time for me using a spray primer so it may have been user error rather than the product. I had really good luck with Krylon Colormaster paint + primer spray paint with the semi gloss finish. (If I had to do it again, I would skip the primer and head straight to the paint plus primer option.) This isn’t the greatest photo but the shelves looked great at this point. The problem was the desktop, there were spots that just wouldn’t take the paint, not sure whether it was a glue issue or distortion of the MDF where the legs were attached. Either way we needed another alternative for the desktop.

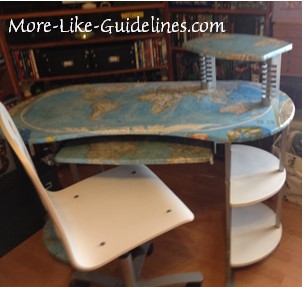
After some thinking, I remembered some old maps that I had come across in the garage. My dad was a teacher and brought home these beautiful National Geographic maps for me. Scarlet and I shuffled through the maps and picked two world maps. I used Mod Podge to decoupage the map pieces onto the desktop.*** There are three pieces, the main image and two smaller pieces on each end. The main piece was a glossier map from 1996, I didn’t even know that my dad was still bringing home the maps at this point. I had graduated from high school, uhm, a couple of years (or more, maybe) before that.

The second map was one that we’d used a lot while we talked about world history. If you look closely at the keyboard shelf you can see the fold lines and even the yellowing from the old cellophane tape we had used to fix it years and years ago. I used this map for the keyboard shelf, the lower left shelf and the small shelf on the desktop.

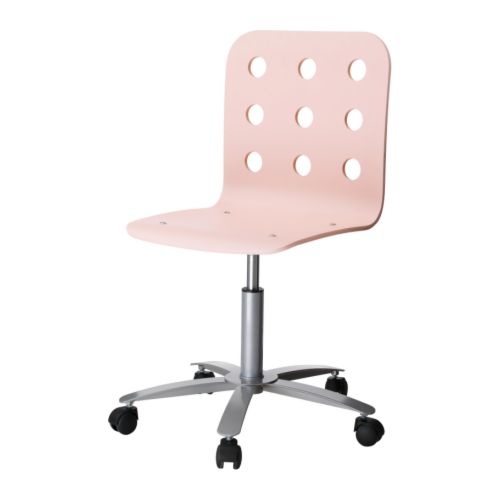
So, then we started thinking about a chair to go with it. Scarlet’s current desk chair is red and black so we decided she needed a new chair. She also had a light pink chair from IKEA, it matched a desk she had originally used at her grandmother’s house but was sent home with us and it now being used as a vanity table in her bedroom.
I detached the seat part of the chair from the base so I didn’t need to tape anything off, much quicker and easier that way. I used the same Krylon Colormaster paint + primer semi-gloss paint on the chair. It took two coats and a touch up pass and it also looks great.
All in all I applied three coats of Mod Podge over the maps and then sealed it all with a clear coat. This was a great, inexpensive project. The desk was free, I already had the maps and the Mod Podge. My total cost was about $15, give or take a little for tax, and that was all paint, (primer, paint and clear coat). This project was fairly easy, as well, I started Saturday afternoon and finished Monday afternoon. I probably could have done it in a day, day and a half, there’s a lot of trips to add a coat on and then go do something else. Put a second coat on and go do something else. I logged a lot of steps on my FitBit the last three days just from walking back and forth to paint, Mod Podge and clear coat..
I am so happy with how it turned out and Scarlet is really excited to use it. The next project will be getting it into the school room. Oh, and new curtains the red and black ones won’t work in the school room any more either. Hmmm…

* Tools used:
- – screwdriver to remove/attach keyboard shelf
- – allen wrench for desktop shelf
- – pliers to remove/attach seat from chair base
- – sandpaper and sanding block
**I was really glad that I had made this decision when it came time to deal with the map. Trying to cut the map piece around the shelf support would have been a real pain in the butt. I like the contrast of the bright white with the colors of the map.
*** I am total rubbish at decoupaging. I love doing it but it seems that no matter what I do I get wrinkles and bubbles. So, considering that little factoid I will not give any tips on decoupaging. I recommend checking out the Mod Podge Rocks! blog because they totally know what they are doing.


